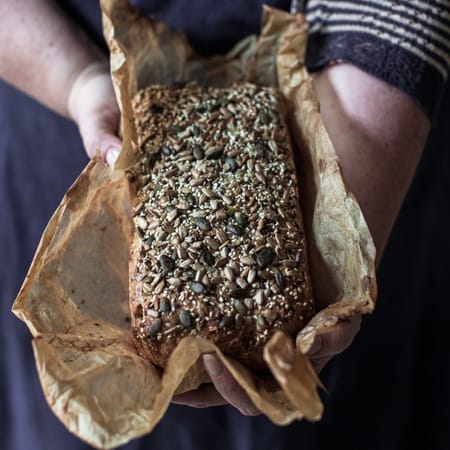
Makes about 3 x 700ml bottles.
Ingredients
- About 350g of sourdough crusts
- 200g sugar, or 170g sugar and 30g black treacle for a deeper, richer flavour
- 1.5 litres black coffee at about 28-30oC
- Ndali vanilla pod, optional
- 1 tablespoon sourdough starter
Equipment
- Large glass jar
- Muslin cloth
- 3 x 700ml glass or plastic bottles
Put the crusts into the large glass jar (the jar needs to be large enough to hold all the ingredients with space left to spare, because as the mixture ferments it will increase in volume). I sometimes toast the crusts first, to accentuate the Maillard reaction and get richer, toffee flavour notes. Add the sugar and stir to combine. Again, if you are looking for a deeper flavour, use a mixture of sugar and black treacle – it’s very good and gives an almost beer-like taste to the kvass.
Pour the black coffee into the jar, warming it first if necessary to help kick start the fermentation process. At this point, I sometimes add an old vanilla pod, if I have one leftover from making vanilla sugar. It adds some really beautiful top notes to the flavour and helps to balance out any beery notes. Then add a tablespoon of sourdough starter, I like to use my chocolate starter. It only needs this small amount to inoculate the mixture with wild yeasts and lactic acid bacteria.
Cover the jar with a loose-fitting lid and leave it to sit on the kitchen counter for about two days. It’s a good idea to put a tray underneath the jar because it can overflow if the fermentation really gets going. You also have to watch out for fruit flies. They are immediately attracted to the fermentation smell, so keep the lid loose, but covering the jar to prevent the fruit flies getting in.
Once the kvass has really started to fizz and you can see the bubbles in there, it is ready to drink as it is. And it’s very good at this stage, but I prefer to give it a secondary fermentation. Drain the bread off through a muslin cloth, straining out all the bits – this is a personal preference, some people like to see the bits at the bottom. I keep the drained bread to one side and use it in making my muesli rye recipe.
The strained liquid should be enough to half fill 3 bottles. It’s difficult to say exactly how much it makes because it’s subject to how much liquid the bread absorbs. The kvass should still be quite sweet but if, when you taste it, you feel that the sugar has all been used up, add another teaspoon.
To make ist stronger, and if there is enough room in your bottle you can further top each of the bottles up with cold, filtered coffee, put on a lid and leave them in a relatively warm environment for about 24-36 hours.
Now here’s the thing, you absolutely must ‘burp’ the bottles, because if you don’t the gas will build up during this secondary fermentation, and you could end up with an explosion. So set an alarm – it’s my key piece of advice for this secondary fermentation, to remind you to burp. Hold the bottle over the kitchen sink as you release the gas and, if you’re using glass bottles, have a clean tea towel wrapped around your hand as you do it, just in case the bottle shatters. My advice if it’s your first time making this kvass, is to use a plastic bottle, just to be on the safe side.
After 24 hours the kvass should be really fizzing away. If the room temperature is colder, it may take up to 36 hours. At this stage the coffee kvass is ready. Store it in the fridge, but remember to continue burping it at least once a day – I do it every morning as the kettle boils for my first cup of coffee.
Note: you don’t have to use coffee in this recipe. You could equally use tea or fruit juices. We often make kvass with our elderflower and rose, or strawberry and mint juices.
This worked out beautifully, bubbly, so refreshing and delicious. I used saved ends of bread from various loaves I had made, and a good portion was a rye chocolate bit I had to hide away so to save just for this. My starter was a rhubarb rye. Both added a wonderful richness to it so absolutely worth it. I also did the second ferment which made it good and livey. Highly recommend, just be sure to follow the advice to burp the bottles!! Thank you for this.
Wonderful Mary thank you – so glad you loved it and it worked out so well! Hope you are your family are all really well.
Lucy x
Hi, I would be really interested in trying out this recipe. However, I am confused about the steps. In the second paragraph, it says “Pour the black coffee into the jar, warming it first if necessary to help kick start the fermentation process”. How much exactly should I add? The ingridient list specified 1.5 liters of coffe, but I see that coffee is also used in the end of the recipe, where it says “Top each of the bottles up with cold, filtered coffee, put on a lid and leave them in a relatively warm environment for about 24-36 hours.”. So I guess my confusion is with the specific volumes of liquid that I am supposed to use in each step (and when to use water and when coffe). Thank you for the recipe.
I have made that sentence a bit clearer now.
It is really if you want to make it stronger then you can top it up with more coffee.
Great, thank you 🙂
Is the caffeine an important part of the process or could I make this with decaf coffee?
Sounds amazing. You never fail with inspiration.
Bringing together all my favourite interests (sourdough,coffee and fermentation).
Sounds amazing. You never fail with inspiration.
Bringing together all my favourite interests (sourdough,coffee and fermentation).